Most people assume the hard part of a visa application is the paperwork: the bank statements, the itinerary, the employment letter. In practice, one of the most frequent reasons an application gets held up is far more mundane. It’s the photo.
Consular staff and passport agencies process thousands of images a week, and they check them against a narrow technical standard. A photo that looks perfectly good on your phone can fail that standard for reasons most applicants never think about. The result is rarely a denial — it’s a delay, which for anyone traveling on a fixed date amounts to much the same problem.
Here are the errors that come up most often, and what to do instead.
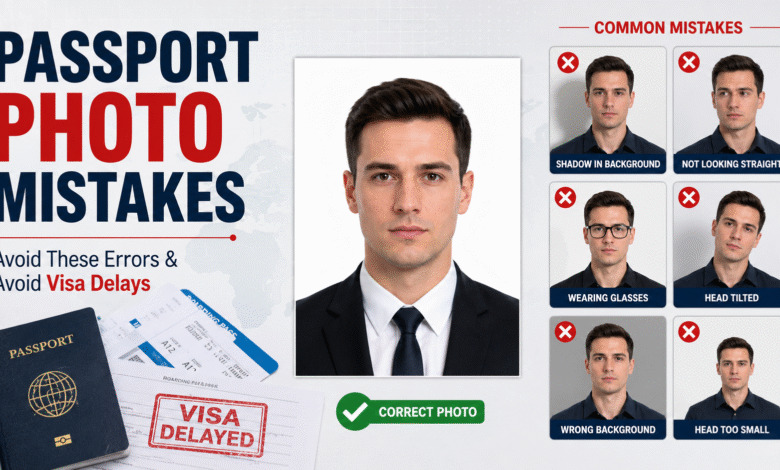
The Background Is Not as Plain as You Think
Nearly every country’s guidelines call for a plain white or off-white background. Applicants usually try to comply by standing against a wall at home. The trouble is that walls are almost never uniform under indoor lighting.
Common failures include:
- A shadow cast by the subject onto the wall behind them
- Visible texture from painted plaster or wallpaper
- A colour cast — walls that read as cream, grey, or faintly blue in the final image
- Door frames, light switches, or picture hooks creeping into the frame
If you’re shooting at home, stand at least a metre away from the wall and face a window. Distance kills the shadow; daylight keeps the colour honest.
Wearing the Wrong Expression
Biometric photo systems compare facial landmarks: the distance between the eyes, the position of the mouth, the shape of the jaw. Anything that distorts those measurements causes problems.
A closed-mouth, neutral expression is the safe choice. A broad smile changes the shape of the cheeks and eyes enough that some automated systems reject it outright. Raised eyebrows, a tilted head, or squinting into bright light will do the same. Look straight into the lens with both eyes fully open.
Glasses, Head Coverings, and Jewellery
The United States stopped accepting eyeglasses in passport photos in 2016, and a number of other countries have since followed. Even where glasses are technically permitted, glare on the lenses or frames obscuring the eyes will get the image kicked back. The simplest approach is to take them off.
Head coverings are generally allowed when worn for religious or medical reasons, but the full face must be visible from the bottom of the chin to the top of the forehead. Large earrings and reflective jewellery near the face are best removed — they add nothing and occasionally trigger a flag.
Getting the Dimensions and Head Size Wrong
This is the mistake that trips up otherwise careful applicants, because it isn’t visible to the naked eye.
The US standard requires a 2×2 inch square image in which the head measures between 1 and 1 3/8 inches from the bottom of the chin to the top of the head, with the eyes positioned roughly 1 1/8 to 1 3/8 inches from the bottom edge. The Schengen standard is different again: 35mm by 45mm, with the face occupying 70 to 80 percent of the frame. Cropping a phone photo by eye almost never lands inside these tolerances.
This is where using an online passport photo tool tends to save applicants a second trip, since the crop and head-height measurements are applied against the published specification rather than estimated. It’s a small step, but dimensional errors are among the easiest rejections to prevent and among the most common to make.
Using an Old Photo
Passport regulations in most countries require the image to have been taken within the last six months. Reusing a photo from a previous renewal — or one taken for a different document a year ago — is a straightforward rejection, even if you look identical.
Agencies also compare the new photo against the one on file. If they’re the same image, the application stops there.
Print and File Quality Problems
Digital submissions have their own set of failure points. Files that are too small, heavily compressed, or run through a phone’s beauty filter will not pass. Some systems specify a minimum of 600 by 600 pixels for a 2×2 image; check the requirement for your destination before you upload.
For printed photos, use photo-grade paper. Standard office printer output on copy paper fades, curls, and shows banding — all of which are grounds for rejection at the counter.
Building In a Margin for Error
The practical advice is simple: treat the photo as a task with its own deadline rather than an afterthought on submission day.
- Check the specification on the issuing authority’s official website, not a third-party summary
- Take the photo at least two weeks before you plan to submit
- Print two extra copies, since some applications require duplicates
- Keep the digital original in case an online form needs it later
Travel documents fail on small technicalities more often than on substance. Ten minutes spent on the photo, done properly, is the cheapest insurance in the entire application.